
Stefan Kudla
August 2, 2022
Updated September 3, 2026
Note: This article has been archived as it may contain features or techniques not supported with the latest version of Cosmic.
The Next Image component is one of the most useful and utilized features of Next.js. This component’s performance, ease of use, and flexibility contributes to the amazing developer experience that Next.js offers.
In this article we will explain how using Next.js Image with a headless CMS can automate optimizations for your website images across all devices and network speeds leading to faster website performance and a better experience for your website visitors.
Updated September 3, 2026. This article was originally written against Next.js 12 and an older Cosmic SDK. Both have changed, and the code below has been corrected: examples now use the official
@cosmicjs/sdkpackage, and thelayout/objectFitprops have been replaced with the currentfillandstyleprops. Verified against the Next.js Image component reference on September 3, 2026.
Before we get into the code, let’s make ourselves familiar with the Next Image component and how we use it to load images from a headless CMS. You can also follow along with us over on YouTube, where we discuss this article in depth.
The Next Image component
The Next Image component provides cutting-edge features designed for the modern web by optimizing the standard <img> element in your code. It assigns the HTML srcset so that images are served responsively based on screen size. Smaller devices will be served a smaller image file with a lower resolution, and the image will scale up in resolution as the screen size increases. Next.js handles this automatically. Here’s what that looks like:
Input
<Image
  src={url}
  quality={60}
  alt={`Cover image for ${title}`}
  fill
  style={{ objectFit: 'cover' }}
  sizes="100vw"
  placeholder="blur"
  blurDataURL={`${url}?auto=format,compress&q=1&blur=500&w=2`}
  priority
/>
Output
<img alt="Cover image for Coding Your Design System with Tailwind CSS" sizes="100vw" srcset="/_next/image?url=https%3A%2F%2Fimgix.cosmicjs.com%2F87625240-0acb-11ed-b7be-d956591ad437-design-systems-tailwind.png&w=640&q=75 640w, /_next/image?url=https%3A%2F%2Fimgix.cosmicjs.com%2F87625240-0acb-11ed-b7be-d956591ad437-design-systems-tailwind.png&w=1080&q=75 1080w, /_next/image?url=https%3A%2F%2Fimgix.cosmicjs.com%2F87625240-0acb-11ed-b7be-d956591ad437-design-systems-tailwind.png&w=1920&q=75 1920w, /_next/image?url=https%3A%2F%2Fimgix.cosmicjs.com%2F87625240-0acb-11ed-b7be-d956591ad437-design-systems-tailwind.png&w=3840&q=75 3840w" src="/_next/image?url=https%3A%2F%2Fimgix.cosmicjs.com%2F87625240-0acb-11ed-b7be-d956591ad437-design-systems-tailwind.png&w=3840&q=75" decoding="async" data-nimg="fill" class="rounded-t-md transition-all grayscale-0 scale-100 blur-0" style="position: absolute; inset: 0px; object-fit: cover; object-position: center center;">
Out of the box, the Next Image component also lazily loads the images so that they become non-blocking elements. This gives our applications improved page loads and overall better Core Web Vitals. Already, we can see that Next Image handles a lot of the heavy lifting for the developer, and as you explore the component further, you will find even more useful features and use cases.
Images in a headless CMS
When using a CMS like Cosmic, we get some great features that help us store our images in one place, and at that, we can serve these images via the Cosmic REST API and a global image CDN. This means our images won’t live on just one server, but rather on a group of geographically distributed and interconnected servers. These servers will cache the images from a network location closest to the user to speed up page loads.
This is the part that pairs with Next Image rather than competing with it. Next.js resizes and serves the image at request time. The Cosmic image CDN handles storage, global delivery, and on-the-fly transforms through imgix URL parameters, so the file Next.js receives is already the right format and roughly the right size.
Why does any of this matter? User experience. As the modern web develops further and further, we find better solutions that decrease media file size, utilize non-blocking techniques, and get the content of your site to the user much quicker than ever before. This leads to higher consumer retention rates, better conversion rates, and a globally uniform experience for users.
Getting the data from our Cosmic Bucket
If you’d like to follow along with this particular use case, you can install the Developer Portfolio app template and clone the GitHub repository.
First, we must get the data from our Cosmic Bucket into our project using the official Cosmic JavaScript SDK, @cosmicjs/sdk.
npm install @cosmicjs/sdk
import { createBucketClient } from '@cosmicjs/sdk'

const cosmic = createBucketClient({
  bucketSlug: process.env.COSMIC_BUCKET_SLUG,
  readKey: process.env.COSMIC_READ_KEY,
})

export async function getAllPosts() {
  const data = await cosmic.objects
    .find({ type: 'posts' })
    .props('title,slug,metadata')
    .sort('-created_at')
  return data.objects
}
We create an asynchronous function to call the Cosmic REST API and get all of the posts from our Cosmic Bucket by querying on type: 'posts' (the name of our posts object type in Cosmic).
Loading images remotely
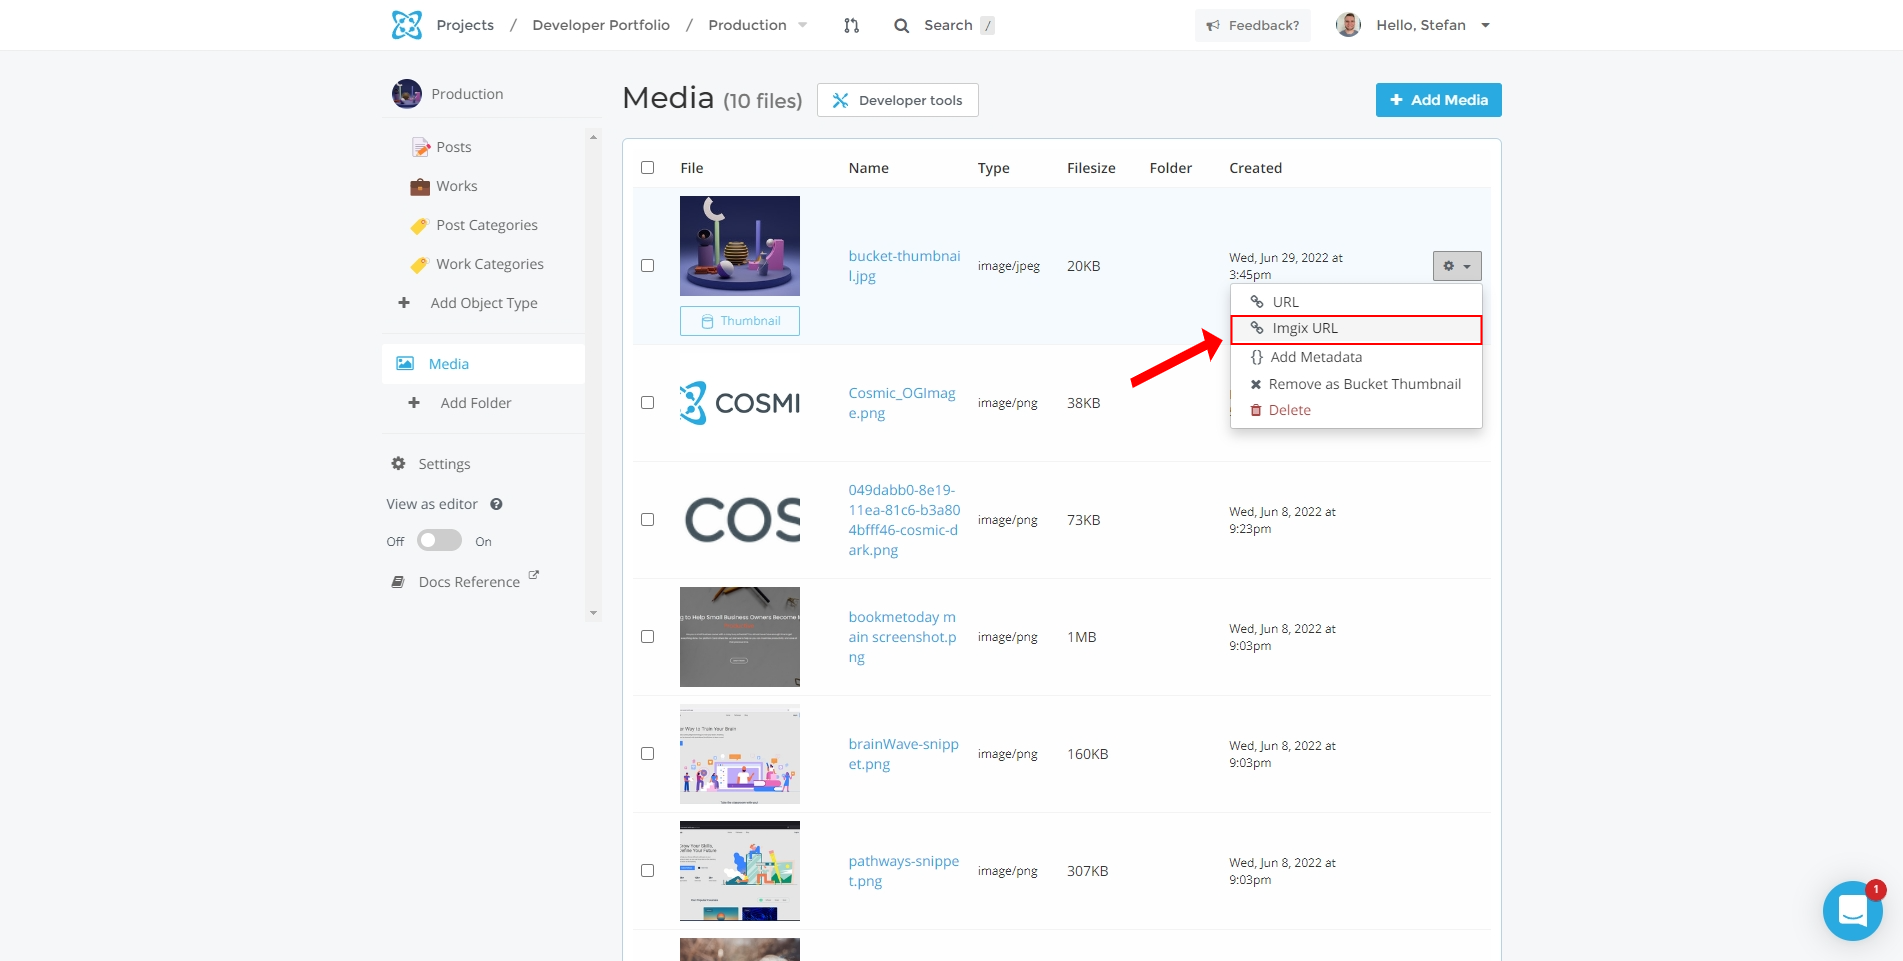
Within the Cosmic dashboard, we can access the images we’ve uploaded to the Cosmic CDN simply by navigating to the media folder. From there, we have a few options such as grabbing the URL, the imgix URL, and adding metadata to the image, such as alt text.
For static images, we can always set the src in our Image component to a specific URL. In your Cosmic dashboard, navigate to the media folder, and on one of the images you’ve uploaded, click on the gear icon. Click on either the URL or the imgix URL selection, and copy and paste the link of the image.
In the code, it would look something like this:
<Image
  src={'https://imgix.cosmicjs.com/87625240-0acb-11ed-b7be-d956591ad437-design-systems-tailwind.png'}
  alt={'Cover image for my article'}
  width={1200}
  height={640}
  sizes="(max-width: 768px) 100vw, 50vw"
  priority
/>
Realistically, we may use a few static remote URLs for the Next Image component in a project, though most commonly we will use Static Imports (images stored locally within the directory of the project) or dynamic URLs from the headless CMS.
In our use case, we will be loading the images from blog posts. Cosmic makes it easy to do this as when you create a new object in Cosmic, you can configure the object Metafields to contain an image Metafield. As a result, creating a new article will give the user the ability to upload the image to the Cosmic CDN and attach it to the blog post all in one go.
Coding the solution
On our [slug] pages, we can get the posts by their slug and query for the metadata.
// /src/posts/[slug].jsx
export async function getStaticProps({ params }) {
  const data = await getPostAndMorePosts(params.slug, preview)
  return {
    props: {
      post: {
        ...data.post,
        content,
      },
    },
  }
}

export async function getStaticPaths() {
  const allPosts = (await getAllPostsWithSlug()) || []
  return {
    paths: allPosts.map(post => `/posts/${post.slug}`),
    fallback: true,
  }
}
Now let’s pass the data into our Next Image component for our blog post header.
// /src/posts/[slug].jsx
import Image from 'next/image'

const Post = ({ post, preview }) => {
  const router = useRouter()
  if (!router.isFallback && !post?.slug) {
    return <PageNotFound />
  }
  return (
    <div className="relative w-full my-4 pb-[55%]">
       <Image
          src={post.metadata.cover_image.imgix_url}
          quality={60}
          alt={`Cover image for ${title}`}
          fill
          style={{ objectFit: 'cover' }}
          sizes="100vw"
          priority
       />
    </div>
  )
}
export default Post
Note that when you use fill, the parent element needs a position of relative, fixed, or absolute, which is what the wrapping div above provides.
Placeholders
To add a placeholder for our remote images, we can utilize imgix queries to request a low-resource version of the image. This image is very small, compressed, and blurred to ensure a very small file size. First we set the placeholder prop to blur and pass the special URL to the blurDataURL prop.
<Image
  src={post.metadata.cover_image.imgix_url}
  quality={60}
  alt={`Cover image for ${title}`}
  fill
  style={{ objectFit: 'cover' }}
  sizes="100vw"
  placeholder="blur"
  blurDataURL={`${post.metadata.cover_image.imgix_url}?auto=format,compress&q=1&blur=500&w=2`}
  priority
/>
The result

Performance optimizations
With Cosmic, we can optimize our images within the dashboard by adding things like specified quality, dimensions, and compression before the images get requested. To do this, go to the Cover Image Metafield and click the Settings button. Then in the settings modal we can add some compression which will reduce the file size and improve the page load. Just like with the placeholder we used earlier, this will add imgix query params to the imgix URL.
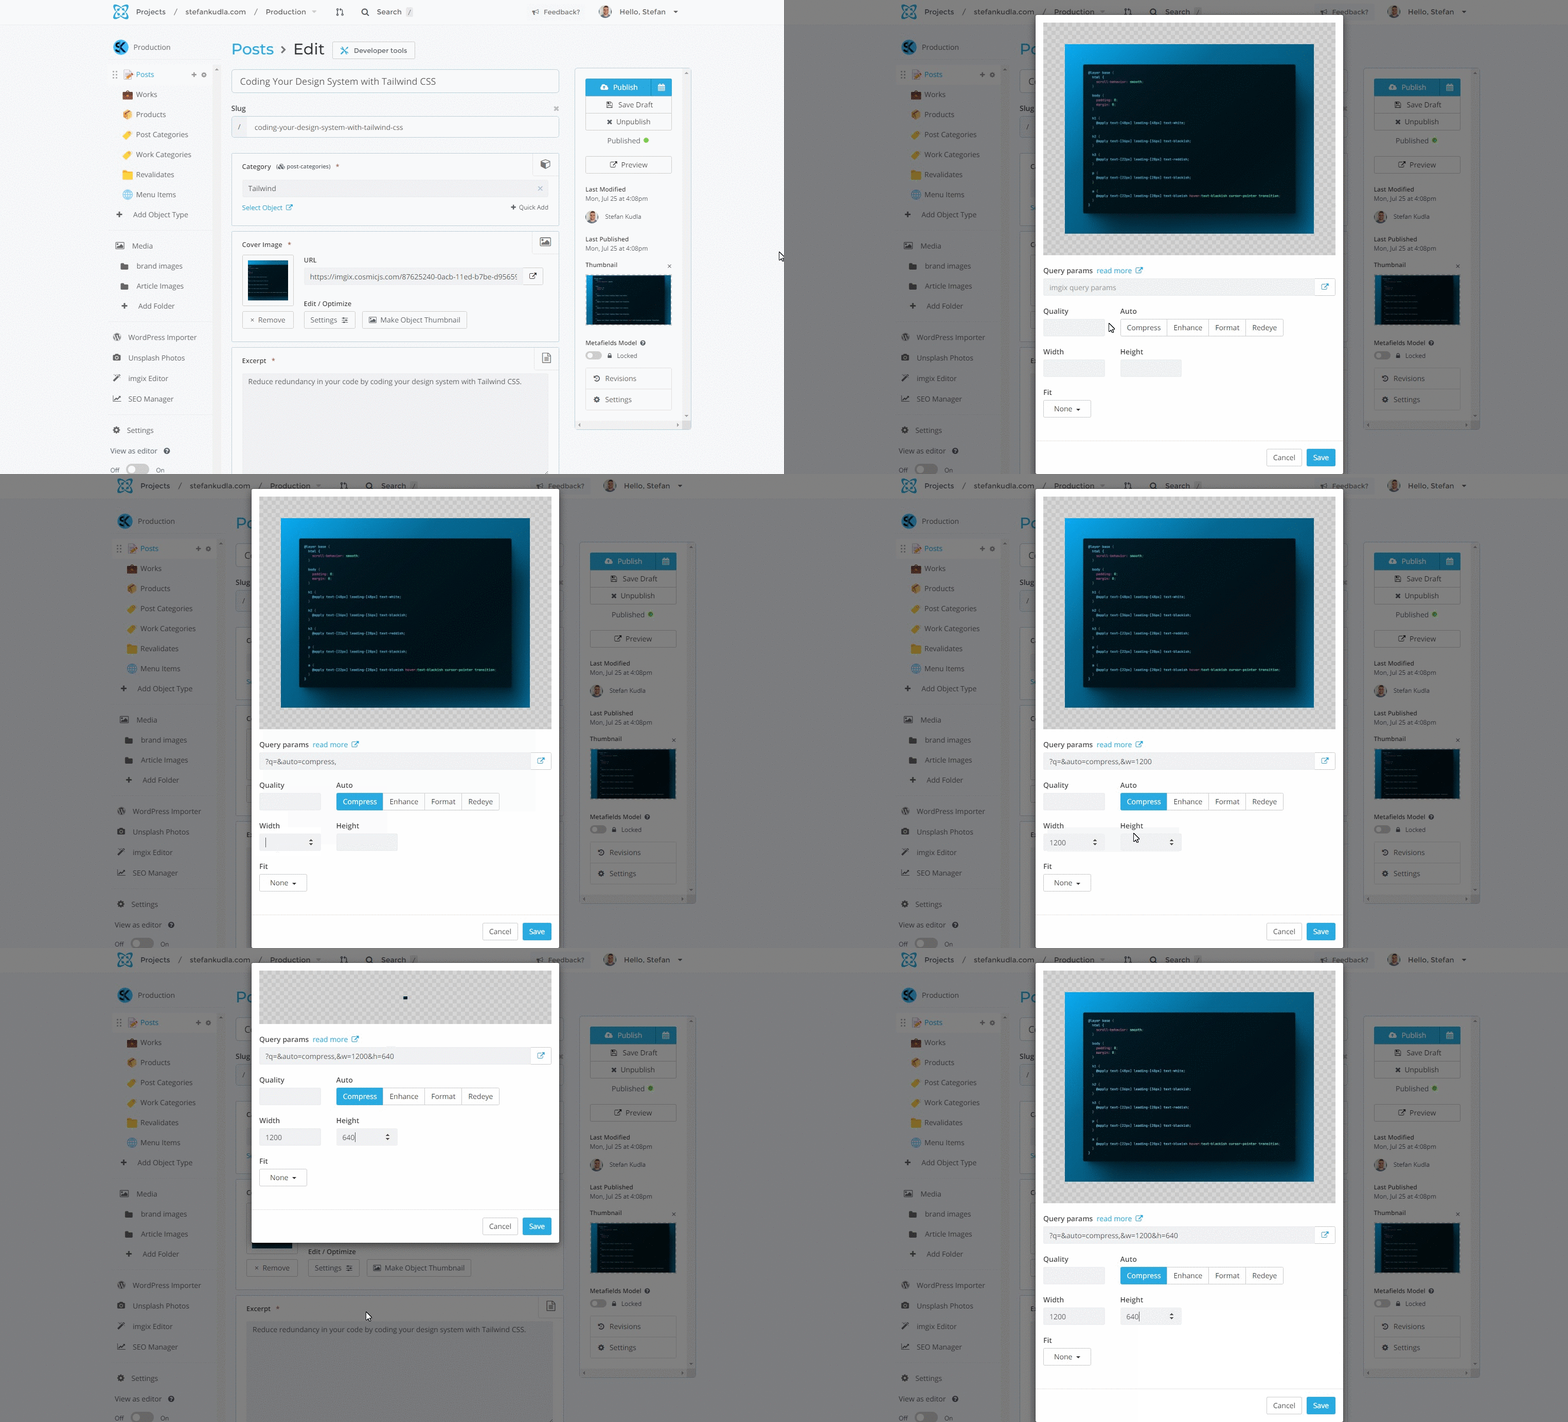
Every image you upload to a Cosmic Bucket gets an imgix_url alongside the raw URL, and those transform parameters work on any plan, including the free one. If you want the storage and delivery side handled while Next.js does the rendering side, that combination is what the Cosmic image CDN is for.
Start a free Cosmic account and upload an image to see the imgix URL and transform params in the dashboard. The free plan includes 1 Bucket and 1,000 Objects, and no credit card is required.
The perfect solution
While there isn’t a perfect solution, the Next Image component does a lot of the work for us by providing features to enable us to fine-tune our images to achieve optimal image sizes and performance across all devices and network speeds ultimately leading to a better experience for our website visitors.
Related reading
- Cosmic Image CDN: storage, global delivery, and imgix transform parameters on every uploaded file.
- Best Headless CMS for React and Next.js: how the SDK, Server Components, and caching fit a Next.js App Router project.
- React CMS: the wider React integration picture, including React Native.
Last verified: September 3, 2026. The Next.js Image props used above were checked against the official Next.js Image component reference on that date. The September 3 pass corrected the SDK package and the deprecated layout / objectFit props, added internal links, and added a signup CTA. No pricing or benchmark figure was introduced.