Building a Blog with Go, Tailwind CSS, Cosmic & Deploy to Heroku with GitHub Actions

Jazib Sawar
September 16, 2020
Note: This article has been archived as it may contain features or techniques not supported with the latest version of Cosmic.
In this walkthrough, I'm going to show you how I built a blog in Go with content powered by the Cosmic headless CMS. I'll also talk about styling it using Tailwind CSS and lastly, I'll show you how you can utilize GitHub Actions to deploy your Go-based applications to Heroku. Let's get started.
TL;DR
View Demo
View the full source code on GitHub
Install the App
Fundamentals
Every blog consists of at least two components:
- List Page (Blog roll)
- Individual Blog Post Page
Go is an excellent back-end language to build an optimized and highly concurrent application. In order to show the potential of Go to our Cosmic Community, I'll be building a simple blog application. To get started, we'll need to populate content in Cosmic.
Blog Data
In order to provide the blog post data, I installed the Simple Blog app on my Cosmic Account Bucket and voila my blog CMS and API service was ready within seconds.
But if you don't want to install an App and want to try it on your own, you can follow these steps.
- Log in and Create a new Bucket in Cosmic
- Create an Object Type
Postsin that bucket. - Add following Metafields
- Hero -> Image/File Metafield
- Description -> Textarea Metafield
Go App Code
This Go Blog app has three major components
- Domain
- Routes
- Templates
Now, I will go through each of them separately.
Domain
Go is a statically typed language, meaning, in order to work with Go, we need to create structs to process the data from the Cosmic API. In our blog application, I will be working with one data model Post. Our Poststruct consists of Title, Slug, Content, CreatedAt and Metadata.
// Post is a representation of post object
type Post struct {
  Title     string
  Slug      string
  Content   template.HTML
  CreatedAt time.Time `json:"created_at"`
  Metadata  Metadata
}
As you see, I added json:"created_at" to our CreatedAt attribute, which I'll explain later on why it is required. Also, you see Metadata is a linked struct which contains hero and descriptionMetafields from Cosmic CMS.
// Metadata is a representation of metadata object
type Metadata struct {
  Hero        Image
  Description string
}

// Image is a object of URL & ImgixURL
type Image struct {
  URL      string
  ImgixURL string `json:"imgix_url"`
}
As this point, our Domain is completed. But there are few more structs needed as our Cosmic API returns different JSON responses from the multiple Objects and single Object endpoints. Below is the full code for domain.go file which I put in src/domain directory for clean code structure.
package domain

import (
  "html/template"
  "time"
)

// ObjectsData is a array of objects from Cosmic API
type ObjectsData struct {
  Objects []Post
}

// ObjectData is a object from Cosmic API
type ObjectData struct {
  Object Post
}

// Post is a representation of post object
type Post struct {
  Title     string
  Slug      string
  Content   template.HTML
  CreatedAt time.Time `json:"created_at"`
  Metadata  Metadata
}

// Metadata is a representation of metadata object
type Metadata struct {
  Hero        Image
  Description string
}

// Image is a object of URL & ImgixURL
type Image struct {
  URL      string
  ImgixURL string `json:"imgix_url"`
}
As mentioned before, I added JSON field name from API response in front of some attributes i.e json:"created_at". It is because we will be using JSON Unmarshal in Go to parse and map the JSON response to our domain models. As it
doesn't work with fields having underscore in it. So, we need to explicitly tell the name of the fields.
Now, I'll move to building routes and controllers for our application.
Routes (Controllers)
In every blog application, there are two major pages. One that will show the list of all blog posts and another which will show the single blog post. Before I'll implement controller actions, I'll show you how I set up the simple Go web server and routes using net/http and gorilla/mux modules. Below is the code for app.go file which is responsible for handling our routes and HTTP server.
package main

import (
  "fmt"
  "go-cosmic-blog/src/handlers"
  "go-cosmic-blog/src/utils"
  "log"
  "net/http"

  "github.com/gorilla/mux"
  "github.com/joho/godotenv"
)

func main() {
r := mux.NewRouter()

// Choose the folder to serve
staticDir := "/static/"

// Create the route
r.PathPrefix(staticDir).Handler(http.StripPrefix(staticDir, http.FileServer(http.Dir("."+staticDir))))

r.HandleFunc("/", handlers.Index).Methods("GET")
r.HandleFunc("/{slug}", handlers.Single).Methods("GET")

if err := godotenv.Load(); err != nil {
  log.Println("Error loading .env file")
}

port := utils.GetPortEnv()

fmt.Println("Starting server at port", port)
  if err := http.ListenAndServe(port, r); err != nil {
    log.Fatal(err)
  }
}
As you see I also included joho/godotenv and two local modules go-cosmic-blog/src/handlers and go-cosmic-blog/src/utils. joho/godotenv will handle the environment variables from .env file and go-cosmic-blog/src/utilshave helper functions for our application.
You can look at .env.example file here and src/utils/helpers.go
here.
Now, I'll show you the creation of Index Handler. To keep everything structured, I created index.go file in src/handlers/ directory. This index handler will fetch the blog posts from Cosmic CMS, parse and map it to our domain models and then send that data to HTML templates. So, our skeleton for Index handler is as bellow:
package handlers // our local package name

// Index handler to serve / route
func Index(w http.ResponseWriter, r *http.Request) {

    // Fetch list of objects from Cosmic CMS

    // Parse and map it to Domain Models

    // send that data to our templates
}
In order to fetch the post objects, I called the Cosmic CMS API endpoint. As this endpoint requires basic parameters like BUCKET_SLUG and READ_KEY. I put them in the .env so that we don't need to hard code them. Below code is getting these parameters from .env and then fetching post Objects from Cosmic CMS API.
if ok := utils.CheckIfEnvExists("BUCKET_SLUG"); !ok {
    http.Error(w, "BUCKET_SLUG is not present in the .env", http.StatusInternalServerError)
    return
}

var readKey string
if ok := utils.CheckIfEnvExists("READ_KEY"); ok {
    readKey = "&read_key=" + os.Getenv("READ_KEY")
}

bucketSlug := os.Getenv("BUCKET_SLUG")

url := utils.APIURL + bucketSlug + "/objects?&hide_metafields=true&type=posts&props=slug,title,content,metadata,created_at" + readKey

res, err := http.Get(url)
Then I used json.Unmarshal function to process the response and map it to our ObjectsData domain model.
var data domain.ObjectsData

if err != nil {
  log.Println(err)
} else {
  body, err := ioutil.ReadAll(res.Body)
  if err != nil {
    log.Println(err)
  } else {
    json.Unmarshal(body, &data)
  }
}
Finally, I passed the processed data to the template to render it. Below is the complete code for src/handlers/index.go file.
package handlers

import (
  "encoding/json"
  "go-cosmic-blog/src/domain"
  "go-cosmic-blog/src/utils"
  "io/ioutil"
  "log"
  "net/http"
  "os"
  "text/template"
)

// Index handler to serve / route
func Index(w http.ResponseWriter, r *http.Request) {

if ok := utils.CheckIfEnvExists("BUCKET_SLUG"); !ok {
  http.Error(w, "BUCKET_SLUG is not present in the .env", http.StatusInternalServerError)
  return
}

var readKey string
if ok := utils.CheckIfEnvExists("READ_KEY"); ok {
  readKey = "&read_key=" + os.Getenv("READ_KEY")
}

bucketSlug := os.Getenv("BUCKET_SLUG")

url := utils.APIURL + bucketSlug + "/objects?&hide_metafields=true&type=posts&props=slug,title,content,metadata,created_at" + readKey

res, err := http.Get(url)
var data domain.ObjectsData

if err != nil {
  log.Println(err)
} else {
  body, err := ioutil.ReadAll(res.Body)
  if err != nil {
    log.Println(err)
  } else {
    json.Unmarshal(body, &data)
  }
}

t, _ := template.ParseFiles(
  "src/templates/index.html",
  "src/templates/head.html",
  "src/templates/header.html",
  "src/templates/footer.html",
)

t.Execute(w, data)
}
Similarly, I created the Single Handler in src/handlers/single.go. You can copy code from here.
Now, our routes and controller part is complete. Let's move to render templates.
Templates
For rendering our templates, I used text/template which is easy and quite powerful as well. Furthermore, you can look at this Go Template Cheat Sheet for your understanding.
For better code structure, I divide the template into head, header and footer. Then index template is for index route and single template is for single post page. Below is the code of src/templates/index.htmlwhich is self-explanatory.
{{template "head"}}
{{template "header"}}
  <section class="container mx-auto px-4 py-12 max-w-5xl">
    {{if .Objects}}
      <div class="grid grid-cols-1 sm:grid-cols-2 lg:grid-cols-3 gap-6 gap-y-12">
        {{range .Objects}}
        <article>
          <a href="/{{.Slug}}">
            <div class="h-64 sm:h-56 lg:h-48 rounded-sm bg-gray-500 bg-cover" style="background-image: url({{.Metadata.Hero.ImgixURL}}?w=400)">
            </div>
          </a>
          <h2 class="text-black text-lg font-semibold mt-2">
            <a href="/{{.Slug}}">{{ .Title }}</a>
          </h2>
          <p class="mt-2 text-gray-600">{{.Metadata.Description}}</p>
          <div class="mt-1"><time class="text-gray-400 font-semibold">{{.CreatedAt.Format "02 Jan 2006"}}</time></div>
        </article>
        {{end}}
      </div>
    {{else}}
      <h2>No post found</h2>
    {{end}}
  </section>
{{template "footer"}}
The rest of the templates you can check out here.
Styling
As you may already notice, I used classes in HTML templates for styling purposes. And these classes are from Tailwind CSS which is a modern CSS framework for building custom designs. In order to use Tailwind CSS in this application, I installed npm packages using this command npm i -D tailwindcss cssnano postcss-cli and then I created static/styles/tailwind.cssfile with the following content.
Note: you need to have node and npm installed for this
@tailwind base;
@tailwind components;
@tailwind utilities;
For markdown support, I copied Github Markdown Styles for tailwind into that file as well.
Together with postcss you can build Tailwind CSS and also remove all unused classes in production for the smaller size. You can look at postcss.config.js, tailwind.config.js and npm scripts in package.jsonin code repository.
Finally, for development purposes I installed reflex which is a tool to detect code changes and run our go run app.go command (Note: reflex only works on macOS and Linux). You can install that using this
command:
go get github.com/cespare/reflex
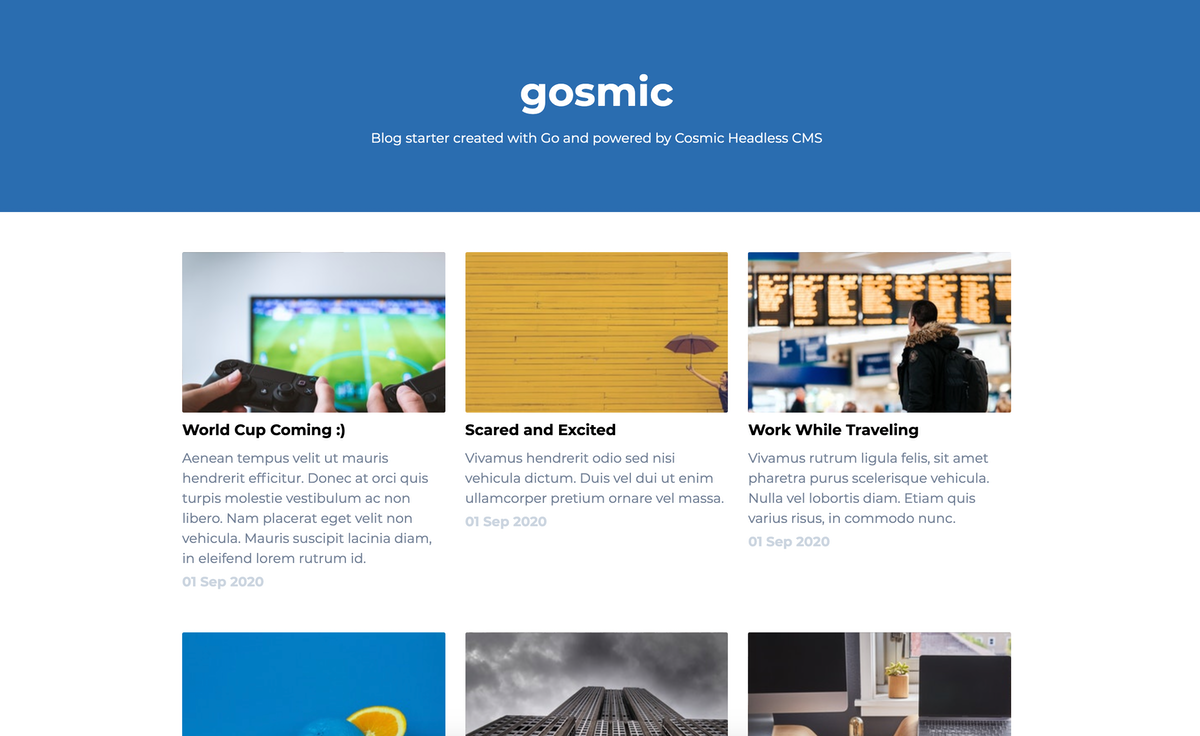
Voila, our blog application is ready. You can run npm start and go to http://localhost:8000 to access the application. It should look something like the screenshot below:
Deployment
At this point, the blog application is fully functional locally. But I wanted to deploy this to heroku as it is very easy for deployments and it supports Go applications. As this repository is on GitHub, I thought to give GitHub Actions a try.
I looked around and found a very easy GitHub action for Heroku deployments here.
To set up it properly, we need to make sure our Go application has a go.mod file. Also, I need to add secrets in our GitHub repository settings i.e BUCKET_SLUG, HEROKU_API_KEY, HEROKU_APP_NAME, HEROKU_EMAIL, READ_KEY.
After that, I just needed to use actions/checkout@v2 to check out our repository and then trigger Heroku deploy. Below is the full code for our Github Action file .github/workflows/production.yml.
name: Production Deployment

on:
  push:
    branches: master

jobs:
  build:
    name: Build
    runs-on: ubuntu-latest
    steps:
    - name: Check out code
      uses: actions/checkout@v2
    - name: Deploy to Heroku
      uses: akhileshns/heroku-deploy@v3.4.6 # This is the action
      with:
        heroku_api_key: ${{secrets.HEROKU_API_KEY}}
        heroku_app_name: ${{secrets.HEROKU_APP_NAME}}
        heroku_email: ${{secrets.HEROKU_EMAIL}}
        branch: "master"
      env:
        HD_BUCKET_SLUG: ${{secrets.BUCKET_SLUG}}
        HD_READ_KEY: ${{secrets.READ_KEY}}
This will trigger the deployment on very commit in master branch.
Conclusion
After this whole journey, I can confidently say that Go is a super simple and robust language to build your backend application. In addition, these are my takeaways:
- Tailwind is the best CSS framework for building custom designs. It is very customizable.
- It is very simple to add CI/CD to our application using GitHub Actions and it has very generous developer-friendly free tier.
- Application deployments are very simple and easy with Heroku.
Hope you liked this article. If you have any comments or questions about building websites and apps with Cosmic, reach out to us on Twitter and join the conversation on Slack. You can also follow another step-by-step Go Guide in the Cosmic Docs.
Continue Learning
Ready to get started?
Build your next project with Cosmic and start creating content faster.
No credit card required • Free forever