Ankit Kumar
January 24, 2019

In this tutorial I will show you how to build a progressive web app using React.js and Cosmic. Our PWA will respond with status 200 when you are offline. The app will attain the last state of data and display it to you when you are offline. We will start with the basics and complete the app in full details. After completion we will deploy it to the Cosmic App Server, so let's get started.
TL;DR
Checkout the demo
Admin Credentials:
email: admin@abc.com
password: admin
What are We Building?
As the title explained we are building a progressive web app (PWA) which will display news published by an admin. Let's start by explaining what a PWA is in simple words:
A PWA is a ordinary website that has some extra and unique features which make it extraordinary. Here are those features:
- You can use these apps while you are offline, that means these apps give a response code 200 while internet is disconnected
- Second most important feature is that you can install it on your device ( either desktop or mobile )
- These apps are fully responsive in nature
We will be implementing this app using React.js with the power of Cosmic. Let's start.
Requirements
Node.js must be installed on your system to to run npm commands, with the help of which we will install react app. For more information, you can refer to React Docs.
Getting Started
Now that our system is configured with the required modules and tools, we are going to create a progressive web app project in React.js using Cosmic. Go to your any specific folder where you want to place your project and open console (terminal) and type the following command:
npx create-react-app react-pwa
here react-pwa is the name of your app and then goto created folder react-pwa and run command:
npm start
It will compile your basic React.js app and automatically opens in default browser. By default it runs on the port number 3000: http://localhost:3000/
Configure React App with Cosmic
Till now, we have just implemented the front-end part of the PWA, now it is time to configure the server i.e. Cosmic server and database. It gives two in one facility.
First of all, signup on Cosmic for free and create your first Bucket. Now create an Object-Type, which in our case is Admin. Similarly create two more object types named 1) News and 2) Comments. These three object types have different purposes: Admin will save the credentials of admin, News will save the news published by admin and Comments will save the comments posted by users.

Now go to Settings > Basic Settings and generate read_key as well as write_key, and save all information of this page in a separate file on your system. Now place all of this information in the folder of your project and path will be: src>config>config.js
To manage your project properly, you should create different folders for components, services, config files, css and images. It will help any third person to understand your code properly. All of these folders should reside in src folder. So create them first and jump to next step.
Ready Made Bucket
For this project you can directly import a bucket to your dashboard, in that bucket we have already created object-types. You have to download bucket.json from our git repo and then just follow the steps: Choose default bucket > Go to Settings > go to Import / Export and click the button "Add import file". It will import the bucket.json file.

Here we have created the platform to implement our PWA, so let's move to the next one.
Admin Login
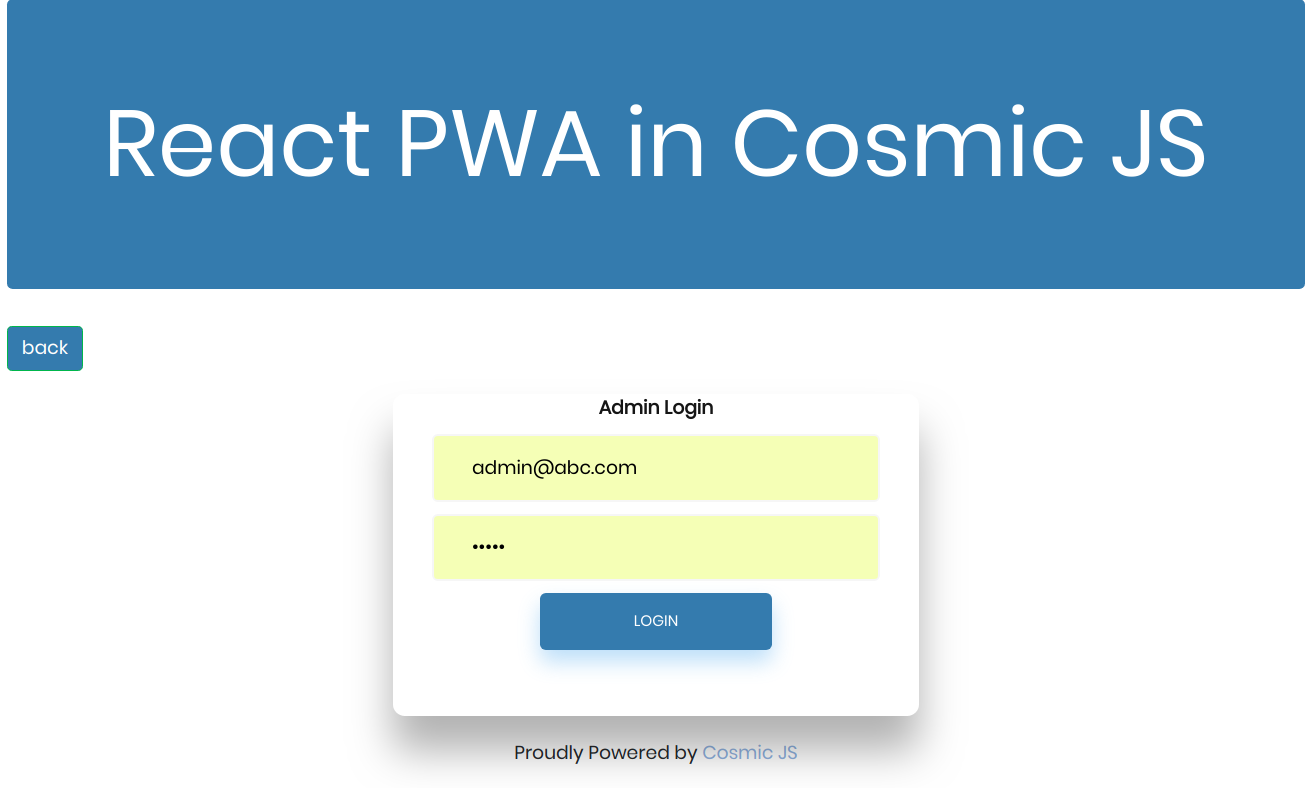
In our bucket, there is an object-type "Admin". Create an object with title admin, and metafields email & password. You can give the values of email and passwords according to you. Here we gave email: admin@abc.com and password: admin. Later you can use them for admin login in our demo.
Create a login page for admin in src>components>login.js
On this page we are simply logging the admin in. We have statically created the email and password in the object-type "admin" and with those credentials we are logging him in. Here we imported the authentication service and in the onSubmit() function we are calling the login() function which is declared in the authentication service. In componentDidMount() we simply applied navigation when admin already logged in.
Dashboard Component
In this component we simply displayed the three links: Home, Add News and Logout. From here admin can navigate to main page, of can add a news or can logged himself out.
On loading we applied navigation which will take the admin to home page if he is logged out and still trying to access this page. On logout() function we cleared the local storage and on the link Add News we navigated the admin to addnews.js. Location of this file is: src>components>dashboard.js
Add News
This component is accessible only for admin. He can post news over here. He can add title, description and body of the news. It will save the complete thread to object-type 'news' on the Cosmic server. Location of this component is: src>components>addnews.js
Home Page
On home page we are displaying all news which are published by the admin. First of all check its coding:
This is the news.js and it is fetching as well as displaying the news on the home page of our app. We are explaining the working of getNews() method. If your device is online, then it is fetching data from backend and displaying on the template and also saving it on browser for offline use too. If the device is offline, then it will get the saved data from browser memory and will show to the user.

Here you are seeing the title and description of the news and click to "Complete News" to read full story. This link will take you to next component:
Single News Component
This component is fetching the single news which you clicked from the home page. Check its coding first:
It is displaying the single news as well as there is an option of comment also. Comments related to the post are displayed here and you can add comments also. singleNews() method is fetching the news at one time and we applied a filter to get the selected news. allComments() function is getting all comments and filtering the comments related to this single post only.

Services
There are two services named authentication service and news service. Let us explain them one by one:
Authentication Service: This is only for logging the admin in. There is one method defined which is searching the email and password supplied the the login page and returns the result to calling method.
News Service: This is the main service of this project which is handling almost everything here. Go through its coding first:
Let's explain its methods one by one:
- addNews(): It takes four parameters: title, description, newsbody and date and saves on the object type news
- getNews(): As the name specifies, it fetch all news from the object-type news
- submitComment(): This method submits the comment in the object type "comment"
- allComments(): This get the submitted comments in object-type "comments" on the Cosmic server
Data Modelling
We managed data on Cosmic properly, for this we created some object-types to understand the nature of each datum. Here is three object types : admin, news and comment. Admin stores the information of admin, and news stores the news published by admin. Comment object-type is storing the comments published by readers of our news app.

What Have We Built Till Now?
I want to make clear that our app is an ordinary app until now (in development mode); it doesn't have any PWA features, so let's start making it progressive in nature. When we created this app, it already created a file serviceWorker.js in the src folder, which handles the progressive nature of the app. At the time of online use, it automatically stores the static data of the app and reflects when the app is offline.
Our app is not behaving a PWA because in serviceWorker it is coded to become a PWA only in production mode. So make its build and then run build, you will get some messages in the console like this:

This is the static data capturing of the app. If you want to capture the dynamic data, you need to code it manually. We did this in the news.js file. We stored the app data when the app is online and it automatically called when app will be offline. So to enjoy its PWA feature, run the following commands:
npm run build
serve -s build
Our app is partial-progressive in nature now. It is storing data while offline but it can't be installed on the device yet. We'll make that happen in the next step.
Make App Complete PWA
To make it complete PWA, here is the final step. We need to edit manifest.json, which is present in the public folder. It should look like:
Here we added path of two icons, one for desktop and the other for mobile. Their size should be exactly the same and these two icons should be present in the public folder. Start_url is showing the path of build. This is the main basic coding of manifest and now our app is pure progressive in nature.

In ths above screenshot you can clearly check that Chrome browser is giving the option to install this React app on your system.
Now we are checking out app with lighthouse tool, which is provided by Google to check PWAs, check output of lighthouse below:

In report each milestone achieved by our app except 7th, which is an https related and will be fixed as we deployed it to our Cosmic server which supports HTTPs.
Deploy on Cosmic Server
Now our app is ready and needs some improvement before deployment on Cosmic server. Make sure the followings:
- A public GitHub repo ( private also available if you have connected your Git account )
- Heroku requirements should be matched
You need to follow some steps:
- Install express with command:
npm install --save express - Modify your package.json file, and add the following code
- Now create a file app.js in the root folder and add the following code in it
Finally you made all necessary changes and it is now ready to deploy. Now go to: bucket>setting>deployment and click button deploy to Cosmic. After successful deployment you will receive an email and click on "view app" button to view the app.

Verdict
It is clear that with the help of Cosmic we can create powerful apps and can deploy on their server without any server setting or configuration. Here we created and deployed our React.js progressive application on Cosmic server easily without any difficulty. You don't need to install any extra software to deploy over here.
For any query or comment related to building apps in Cosmic, reach out to us on Twitter and join the conversation on Slack.
Continue Learning
Ready to get started?
Build your next project with Cosmic and start creating content faster.
No credit card required • 75,000+ developers