Aaron Vail
May 31, 2019
In this tutorial I'll be showing you how I built a Vue.js app with Authentication using Cosmic and AWS Lambda prior to deploying to Netlify. Let's get started.
TL;DR

Features
- Netlify hosting (plus CDN, Prerendering, Minification, etc..)
- Vuetify components for interface
- AWS Lambda functions via Netlify
- Cosmic for Database API
- Password hashing using PBKDF2 with Salt
- Email Verification using Nodemailer via SendinBlue
Needed Improvements
- Password reset function
- User avatar support
Prerequisites
You will be required to have Node JS and npm before starting. Make sure you already have them installed. If not you can find them here: https://nodejs.org
In order to deploy you will need a Netlify account.
Also for SMTP server to send email verification link I am using SendInBlue since they give you 300 free emails a day.
Project Structure
Important things to note:
~/public/_redirects
This file is important since it points all your traffic to the index.html file in order for vue-router to handle the requests. To learn more about Netlify redirects visit their docs.
~/cosmic.js
This file is the main entry point for Cosmic node library that we will export in order to use through-out our lambda functions.
~/functions
The functions directory holds all of our lambda functions which will automatically get ran on AWS once we deploy to netlify. We'll be using these functions to handle our hashing and database logic required for Cosmic.
Fork and Clone
First we'll be forking the repository on GitHub. Afterwards open up command line or terminal and clone it to your project folder on your local machine with this command:
git clone https://github.com/cosmicjs/vue-authentication
Use BitBucket or Gitlab instead?
If you prefer to use a different git provider you can just clone the repository and upload it to your desired remote.
Install
In your command line cd into the project root directory that you just cloned and run npm install to download and install all the required dependencies.
Integrate Cosmic Bucket
In your Cosmic account create a new bucket and call it whatever you want.
Download this bucket.json file and go to Import / Export Data page in your Cosmic bucket's Settings, select and upload the downloaded file. This will import all the Object Types and placeholder data.
Next you'll need to modify the cosmic.js file within your project directory to connect to the bucket you just created.
Here's what you'll need:
- Bucket slug
- API Read Access Key
- API Write Access Key
~/cosmic.js
Integrate SendInBlue SMTP
In order for email verification to work you'll need an SMTP server. For the sake of simplicity for this tutorial I will be using SendInBlue since they provide you with 300 free emails and use the Nodemailer npm package to integrate with.
After you create an account go to your SMTP & API settings to generate an SMTP key to use in the CreateNewUser.js Lambda function, you can find it under the "SMTP" tab.

Then enter in your email and SMTP password to the following transporter object.
~/functions/CreateNewUser.js
Running your app locally
In order for the AWS Lambda functions to run locally properly you'll need to run the following command:
npm run start:lambda
This will spin up a local function server using the netlify-functions library.
Next, you'll need to make sure you have a .env file in your root project directory to change the VUE_APP_API_HOST variable to point to the lambda server you just started running. Otherwise your app won't work. Mine started on port 9000 by default.
VUE_APP_API_HOST=http://localhost:9000/
After that you may open another console and finally start the Vue JS application with this command:
npm run serve
In order to test the API locally you may need to run Chrome with CORS disabled, you can find out how to do that depending on your OS with this helpful list:
Windows:
"C:\Program Files (x86)\Google\Chrome\Application\chrome.exe" --disable-web-security --disable-gpu --user-data-dir=~/chromeTemp
OSX:
open -n -a /Applications/Google\ Chrome.app/Contents/MacOS/Google\ Chrome --args --user-data-dir="/tmp/chrome_dev_test" --disable-web-security
Linux:
google-chrome --disable-web-security
Now you can navigate to http://localhost:8080 to open the application.
Deployment with Netlify
Go to your Netlify dashboard and click "New site from Git". Choose your git provider (I use GitHub).
After you authenticate you can see your list of repositories. Select the one you created for this project you created earlier and set the build command to "npm run build" and the publish directory to "dist".

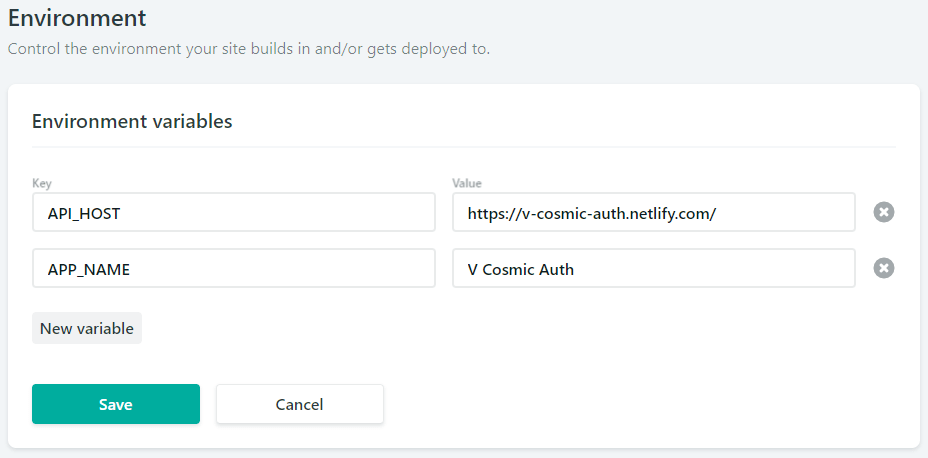
Next, you'll need to make sure you have set the environment variables and have the VUE_APP_API_HOST variable to point to the new site you just created in Netlify. Otherwise your app will not work.
VUE_APP_API_HOST=https://yourNewSite.netlify.com/
Next you want to set your functions directory to use "lambda" which will be the compiled version of the /functions folder.
Conclusion
I built this app for open source under MIT license so feel free to upgrade it, hack it, or break it.
This was built using Cosmic for the user database.. and the password-hash-and-salt library for hashing. Oh, and don't forget Vuetify, the amazing Vue JS component library by John Leider and over 200+ open source contributors.
The email verification is using SMTP server hosted with SendinBlue, they give you 300 free transnational emails. Then of course Vuex for state management.
If you have trouble or it's not working for you let me know in the comments and I'll do my best to help! Or reach out via twitter @Aaron_Vail
Continue Learning
Ready to get started?
Build your next project with Cosmic and start creating content faster.
No credit card required • 75,000+ developers