Building a Full Stack SMS-enabled Chat Application using Twilio, Node.js, GraphQL and Cosmic
Jacob Knaack
June 19, 2019
Note: This article has been archived as it may contain features or techniques not supported with the latest version of Cosmic.
What a day to build! Today we are exploring how far chat has come, and how easy it is build a fully functional chat application complete with the ability to send SMS messages with just a few (super-rad) developer tools that are available with anyone with fingertips. There's quite a lot to cover so let's dive in!
TLDR:
Introduction
Let's talk about goals, what we want to accomplish in the next hour or so.
Our application is at it's core a chat system. We're going to keep things very simple here. Our system will be able to register new users with minimal user information, create and emit messages to users in the chat room, and finally log users out of the chat room when they want to leave.
For bonus points we are also going to configure our system with an SMS notification system, that will send a Text notification to an admin account whenever a message is sent across our system. Pretty cool right?
Before We Start
This system is going to utilize a number of technologies to function. Most importantly Cosmic for managing all of our data: our Users, and our Messages. In order to follow along with this tutorial you should a free bucket on their platform and create a User and a Message Object.
in order to send SMS messages we are leveraging Twilio. A communications platform that allows developers to make phone calls and send text messages through a web API. To implement our notifications you'll have to register for a free Twilio number and start a trial account.
Lastly we are using Node JS as our runtime environment so please be sure you have a recent(ish) version of node installed. With that business out of the way we can start building.
High Level Overview
This is a full stack application, which means we are building a web-server to handle our requests and serve our client side application. We are going to create an Express application that will run on our Node JS server to handle routing to a small API and serve HTML, and Webpack to bundle our client interface built with React and Graphql. This way we can utilize a central server to make requests to the different parts of our application: our Interface, our Controllers, and our Web Services.
There are quite a few moving parts here so let's break down what happening:
Building Our Web Server
This is backbone our our application which will allow us to control . We are going to start by creating and initializing a project directory where all of our dependencies will be installed. Let's open up our terminal and create some files:
$ mkdir chat
$ cd chat
This creates a directory called chat and changes our current directory into that chat directory. Now we can initialize this directory as a Node project:
$ npm init
Your terminal will present you with a couple of prompts to create our package.json file that will contain most of the metadata about our project. I recommend hitting the enter key through these steps unless you know some specific information you'd like to give your application. You can always change these values later.
Now let's install some Node Modules we we need to run our project and save them to package.json dependency list. We are going to install our bundler webpack along with the necessary loaders we need to bundle our JS, HTML, and SASS /CSS files as well as our server framework express:
$ npm install --save webpack webpack-cli clean-webpack-plugin @babel/core @babel/preset-env @babel/preset-react babel-loader file-loader sass-loader css-loader node-sass url-loader style-loader express express-session cookie-parser body-parser socket.io socket.io-client cosmicjs dotenv
We are saving these all as project dependencies since any deployment container we use will need to use these to build our application.
Great, now we are also going to install the dependencies required for rendering our User Interface:
$ npm install --save react react-dom react-router-dom react-icons graphql react-apollo apollo-boost axios
Setting Up Our Entry File
Now that we have some dependencies installed, we need to create an entry file that will handle all of the requests to our application. When a user makes a request to the default route '/', we will serve an HTML file. When the client makes a request to our API, we use endpoints appended with '/api'. The first step is just creating the file:
$ touch index.js
Let's open this file in our text editor and set up Express so that we server some HTML when a browser navigates to our localhost server:
We are looking for an index.html file that is kept in a directory located at ./public so let's go ahead and create this file at ./public/index.html and insert some boilerplate to make sure our
HTML is being served by our express server.
We should be able to start our server using node:
$ node index.js
When this command runs we should see a simple console message:
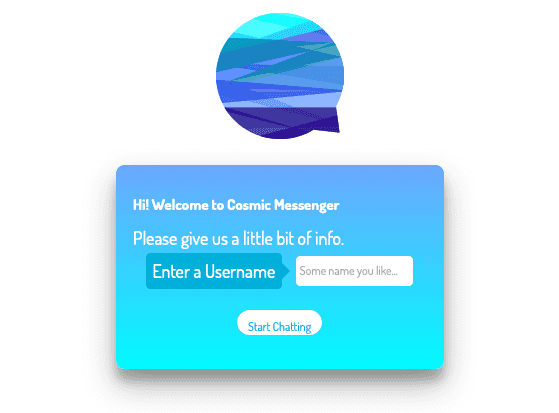
Cosmic Messenger listening on port : 3000
Now pointing our browser to http://localhost:3000 will show us a mostly blank screen but now we see a little "Hello World" at top of our page. Now our server is set up to serve content to our server
Configuring Webpack
We want to build our interface with React, but we need to need to serve this interface from a directory that our node server can access. We also need to compile our javascript from the fancy syntax that we use to build our components to something that all browsers can process. To do this we are going to use Webpack to bundle all of our files into a specific location, and Babel compile all of our code.
Let's create a file called webpack.config.js and add some configuration for bundling our client interface:
This is going to allow us to create source code and organize it in a meaningful way using whatever directory structure we like for structuring logic, then bundle it all into one file that our index.html can reference while it's served from our webServer.
Initializing Our React App
We have our config file created, but now we need to create some source code and make sure webpack bundles everything properly. Let's go ahead and create a folder called src and touch file called app.jswithin. From there we can create a simple React component that will render the same this as before, but now we are serving javascript bundled together and stored on our server and injected into our index.html served from our web server. Server Side Rendering baby!
Here's what our app.js file will look like initially:
Before we run webpack and serve our interface we need to install some developer dependencies and add some simple configuration values to our package.json. Specifically we need to tell our server that we are using babelto compile our interface code and some npm scripts so that we can run our Web Server and bundle our React code.
Let's install some dependencies that we only need to use for local development purposes:
$ npm install --save-dev morgan nodemon webpack-dev-server
With those installed let's open package.json and add a prestart, start, and dev properties to our scripts object as well as a babel config object. Here's how things should look:
Now we can run webpack and node simultaneously by simply running:
$ npm run dev
In a second you'll see some output text from webpack:

Heading back to http://localhost:3000 should produce the same result as before, but now we are serving a React application allowing us to create sensible component classes and render them within our index.html.
Creating our REST API
We are going to interface with our Cosmic resources by making requests to our server file via express routes we'll configure right now.
We will need three POST routes that will handle requests to our server. One for registering users that visit the app, one for messages that get sent to the through the messenger, and a logout route for users wanting to leave the chat.
Along with this we are configuring middleware for handling the request bodies sent through our api, body-parser. A module for creating session cookies to weakly authenticate requests to our messaging service, express-session. And finally we are configuring web sockets so that we can emit event to all the clients connected to our server via socket.io.
socket.io will emit 3 seperate events for the time being: One when a user registers so that other clients can track who is logged in to the app in real time. Inversely, we are tracking a logoutevent that will let user know when users have left the chat. And one for when a message is sent.
If you didn't install them at the beginning of our server setup, you can install them with a quick npm command:
$ npm install --save socket.io socket.io-client express-session body-parser
Now let's open up our entry file: index.js, and add our routes and middleware configuration:
You'll notice several new libraries we are importing. Most notably we are using a middleware called twilioNotifications and cosmicjs which need to be configured before our server will function properly. For twilio notifications to work, we need to create some middleware that will control when an SMS message is sent. We also need to configure this middleware with authentication tokens and keys for the twilio web server. For cosmicjs we need to do the same, grab some Auth Tokens and save them in our environment variable config file.
Configure Our Environment Variables
Let's create a file called .env at the root of our project directory. In it we'll need to store some environment variables, but also some sensitive config variables for our web services. Here's what you need:
You'll need to grab two sets of environment variables. From twilio you'll need your ACCOUNT SID and AUTH TOKEN as well as the phone number associated with your account, which will be located at https://www.twilio.com/console. From cosmicjs we need to grab our read and write keys to authenticate our requests. These can be found at https://cosmicjs.com/cosmic-messenger/settings/main. You may have to generate these from the general settings panel.
Once these are here we must update our webpack.config.js so that we can reference these variables in our client side javascript. The updated file should look something like this:
You'll notice that we added some global app variables using the DefinePlugin method of webpack. Now these variables can be used to referenced in our
Our SMS Notification Middleware
Create a directory called middleware and place a couple files within:
$ mkdir middleware
$ touch middleware/twilioNotifications.js middleware/twilioClient.js middleware/config.js
Our twilioClient file will handle making the request to the Twilio API:
Our twilioNotification file will handle the request object from express and make sure that any routes that use the module will trigger the Twilio client:
Finally we are going to config our middleware with a config file that makes sure our middleware has the necessary configuration variables:
Now are app is all set to function as chat server. All thats left is to create our React components and make them talk to our server to function as a chat interface.
Building Our Interface Components
Our interface will be very straight forward. We'll start by building out our app.js file and set up two routes, one for our registration form, and another for our chat input, messages, and user list. We also want to configure our graphql client so that we can fetch data directly from Cosmic when we are render each page.
Let's create a folder called components under the src directory. In here we will put all of our React components that we want to import into app.js.
Now we need to create our two component rendered within our routing logic: Chat and loginForm. We'll start with our login form at src/components/loginForm.js:
Next we need to create the components for our chat form, for which we'll create a new directory called chat in the components directory. In here we'll create three files, one for the parent chat form component: src/components/chat/index.js:, one for the list of messages: src/components/chat/messageList.js and one for the list of users: src/components/chat/userList.js. Let's start with our chat form:
This component contains our message form that sends text data to our chat server. You'll notice it also emits an event using a module we need to build for handling web socket events. We'll get to that in a second, before that let's create our userList and messageList:
Our UserList simply displays our user's within our UI. It fetches those users from Cosmic's graphql servers and then subscribes to our socket module which refetches data everytime our server emits those events.
Now let's create our MessageList:
Now Let's create our socket module that will let these components subscribe to our server events. Create a new folder called lib and create a file within called socket.js:
With that, we now have a complete full stack chat application, equipped with a client interface rendered server side. With a bonus of notifying an admin when messages are sent over the server.
Next Steps
Since this app is built and run completely from web server, we can easily deploy this using any hosting service that supports Node JS containers. I'd recommend Heroku or Cosmic since they both support project structures like this and can quickly create deployments.
That's all for me this week ya'll. Until the next time.