Mohamed Termoul
September 15, 2018
TL;DR
Vue.js PWA Demo
Vue.js PWA Source Code
Intro
Progressive Web Apps (PWA) combine the look and feel of an app with the ease of programming of a website. These cutting edge apps make it easy for your users to access your content, and engaged users increase your revenue. Rapid Loading is one of its features. PWA's load faster than mobile websites, even with limited internet availability, ensuring your users always have the best experience. Here are the main features:
- Access Anywhere
- Direct Deployment
- Promote with SEO
- Always Available (even offline)
- Easy Updates
- Safe and Secure
One of the best parts of PWA is they are quick to build and quick to get to market without dealing with any phone native code or app store wars.
This application was mainly inspired by Offerup, Letgo, and Craigslist. Like Craigslist, LetGo allows you to buy and sell items locally, which means you don’t have to deal with the hassles of shipping like you would on eBay or Amazon. With 30 million users, it is more popular than OfferUp. LetGo has been featured in many commercial lately, so you may be more familiar with it as well. The only issue is that both apps are mobile apps available on both iPhone and Android platform, however there is no PWA version. So let's sit back and see if we can leverage PWA, Vue and Cosmic to build one.
Application Overview
The application consists of three major functions:
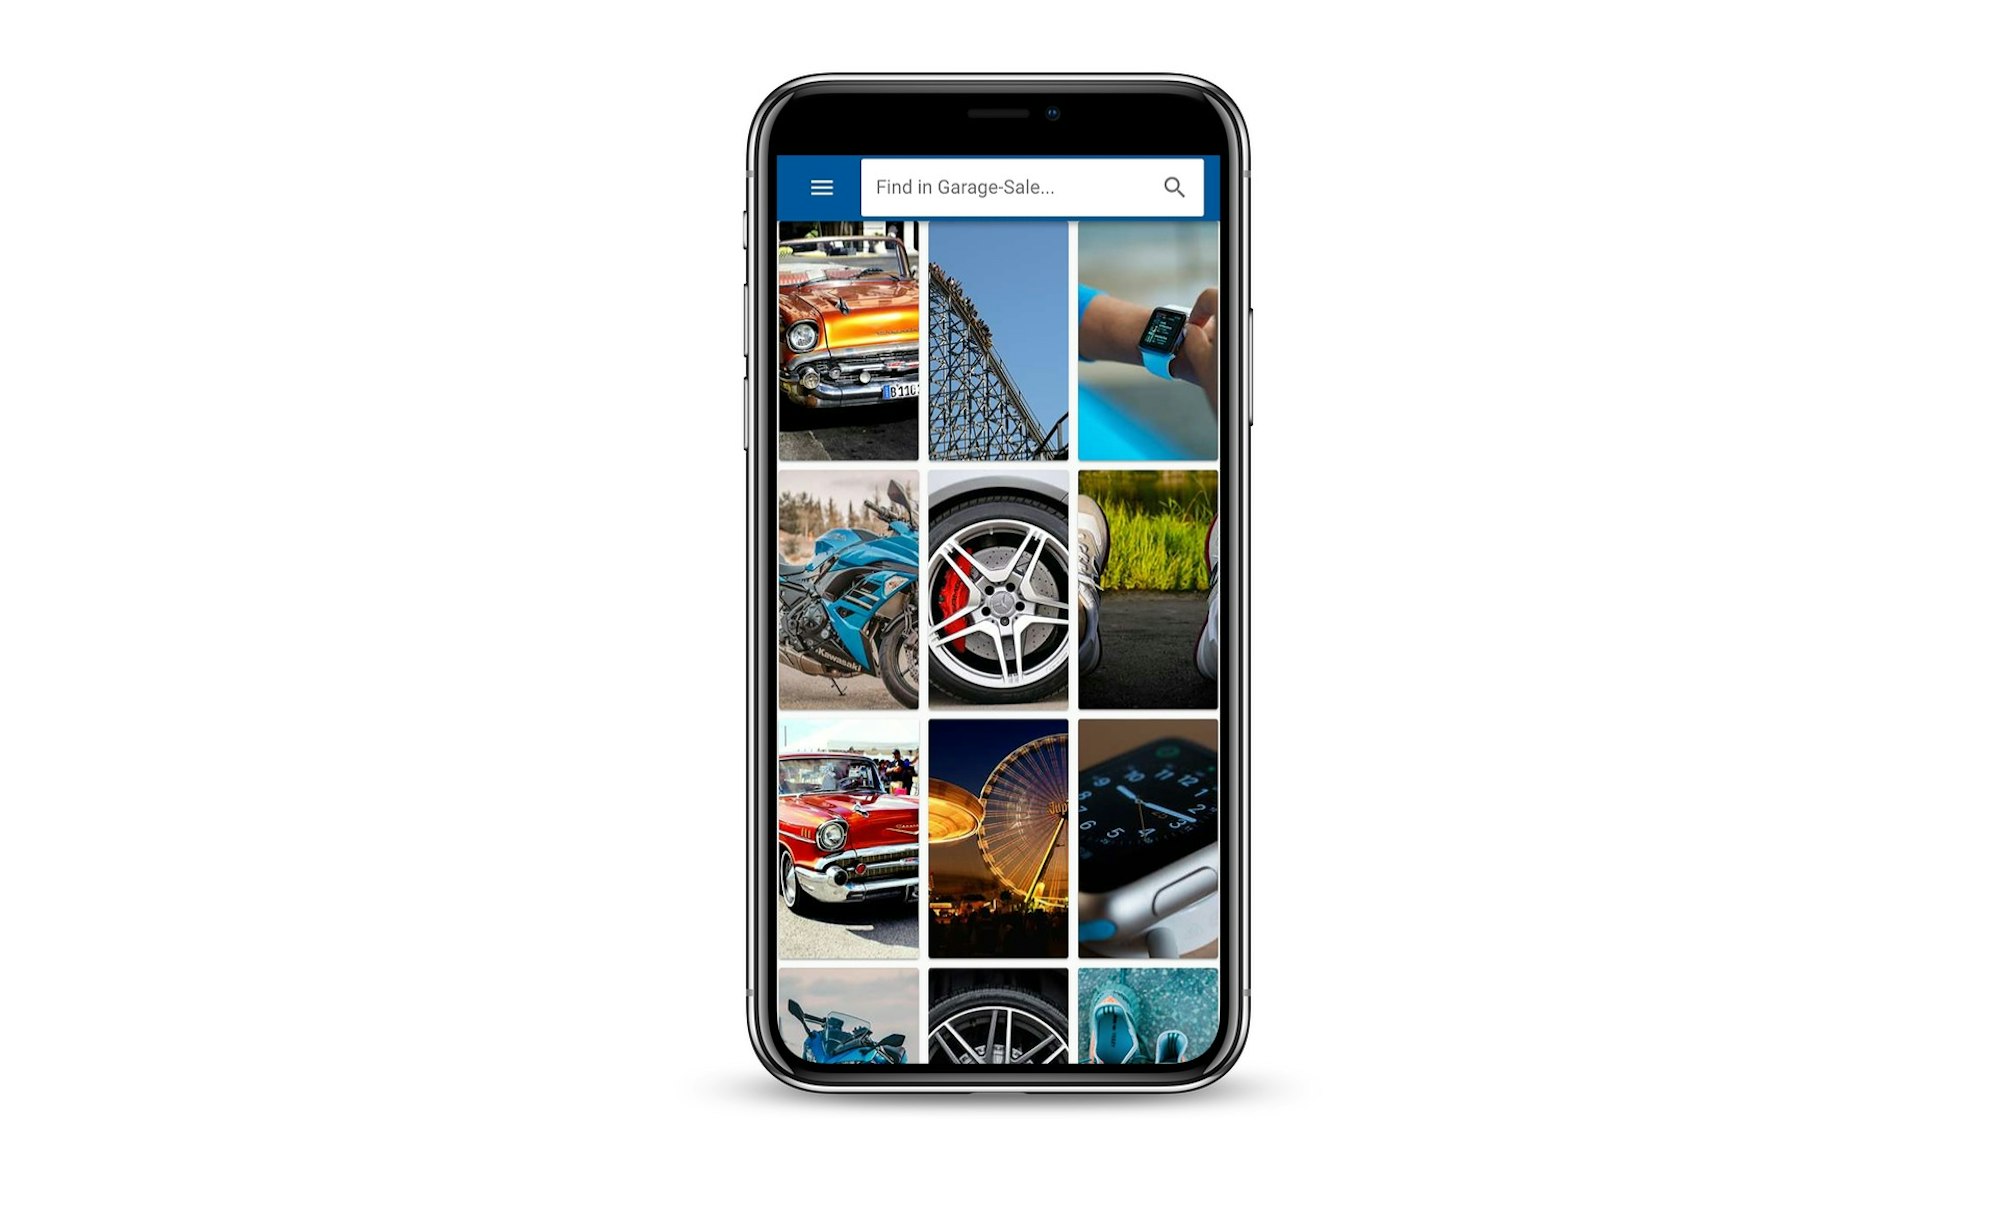
- Display a list of items for sale in your area. In our case it will be a gallery view of all items for sale
- The ability to search for keywords and filter the gallery view to the items matching the search term
- The ability to click an item image and show the item description, seller, more images, and contact seller...
- The ability to add new items. I didn't build this feature due to the scope of this project, but this can certainly add a valuable addition.

Starting your Vue PWA app
Let's roll up our sleeves and get building. We'll start by creating the project using vue-cli commands. However if you don't have vue-cli installed, please follow this. So open your terminal window and type the following:
vue create garage-sale
# then select Manually...

Vue CLI v3.0.0-rc.9
┌───────────────────────────┐
│  Update available: 3.0.0  │
└───────────────────────────┘
? Please pick a preset:
  default (babel, eslint)
❯ Manually select features

# Then select the PWA feature and the other ones with the spacebar
? Please pick a preset: Manually select features
? Check the features needed for your project:
 ◉ Babel
 ◯ TypeScript
❯◉ Progressive Web App (PWA) Support
 ◉ Router
 ◉ Vuex
 ◯ CSS Pre-processors
 ◉ Linter / Formatter
 ◯ Unit Testing
 ◯ E2E Testing

? Pick a linter / formatter config:
  ESLint with error prevention only
  ESLint + Airbnb config
❯ ESLint + Standard config
  ESLint + Prettier

? Pick additional lint features: (Press  to select, a to toggle all, i to invert selection)
❯◉ Lint on save
 ◯ Lint and fix on commit

🎉  Successfully created project barage-sale.
👉  Get started with the following commands:

 $ cd barage-sale
 $ npm run serve
So far, this step looks like any regular Vue app creation except the PWA selection step. Thanks to vue-cli which is a doing a lot work behind the senes and add the service worker option which a major feature of PWAs. So let's continue and add our functions step by step.
We also need to add Vuetify which will be our css framework. Before using Vuetify, I used Bootstrap for most of my projects, however after trying Vuetify, I was hooked since. Vuetify in my opinion offers two major advantages:
- Rapid development, comparing to bootstrap
- Easy integration with Vue
So let's add it to out project:
vue add vue-cli-plugin-vuetify
? Use a pre-made template? (will replace App.vue and HelloWorld.vue) Yes
? Use custom theme? No
? Use a-la-carte components? Yes
? Use babel/polyfill? Yes
✔  Successfully invoked generator for plugin: vue-cli-plugin-vuetify
Also notice, that I picked the use-a-la-carte option when adding Vuetify because I want to customize one of it's components, and also I don't want to import all components from Vuetify. This will keep the files smaller comparing to importing all Vuetify library.
The app manifest
In order to let mobile devices know that your app is PWA capable, you need to enter some information about your app in the manifest.json file. Let's take a look:
{
  "name": "garage-sale",
  "short_name": "garage-sale",
  "icons": [
    {
      "src": "/img/icons/android-chrome-192x192.png",
      "sizes": "192x192",
      "type": "image/png"
    },
    {
      "src": "/img/icons/android-chrome-512x512.png",
      "sizes": "512x512",
      "type": "image/png"
    }
  ],
  "start_url": "/",
  "display": "standalone",
  "background_color": "#000000",
  "theme_color": "#4DBA87"
}
You start by specifying the name of your app, and the icons that can be used for your app shortcut. As PWA application the mobile device browser will ask the user if they want to install your app once they visit your site for the first time. If yes, then a shortcut will be added to the mobile device home screen. It's also worth noting as a part of this app setup, you need to create icons with different sizes that can be used for different mobile device. For me I had to define the following icons:
android-chrome-192x192.png
android-chrome-512x512.png
apple-touch-icon-120x120.png
apple-touch-icon-152x152.png
apple-touch-icon-180x180.png
apple-touch-icon-60x60.png
apple-touch-icon-76x76.png
apple-touch-icon.png
msapplication-icon-144x144.png
mstile-150x150.png
and this is one fo my app icons:
![]()
Add the app components, router, and store
Since the application will act as a SPA (single page app) we need to add the router. For the purpose of our application we only need two routes:
- Home: where we display the posts grid view and the search toolbar
- Post: this is the item detail view where we can see the item details info
So let's open the terminal window, and add the following files:
# adding the vue components
touch src/views/Home.vue
touch src/components/PostGrid.vue
touch src/components/PostItem.vue
touch src/components/PostDetails.vue
touch src/components/PostCarousel.vue

# add router, store,
touch src/router/index.js
touch src/store/index.js
And we add the routes to our application like this:
Note that the router didn't import the PostDetails.vue component at the beginning. This is lazy loading, which means that our app would not load this component at the start to make it faster and only load this component once the user needs it. And let's edit the main.js and the App.vue as the following:
Note that in order to use Vuetify we don't say import Vuetify from 'vuetify' we import from /plugins/vuetifybecause we only need to select which components we are using. Take a look at src/plugins/vuetify.jsand
see how it's done.
Adding the UI code
So let's start by creating our UI as we see below.
So far in our home page we just added a top toolbar with a search text field, search button, and left navigation menu. In the page's content area we just added a component post-grid which will serve as a place holder for our data.
Before moving any further we need some data to test and build our UI components. So without further todo, lets do that in the next section.
Building the backend with Cosmic
Before discovering Cosmic, I use to use either plain JSON files and write a little Node.js application that have a bunch of Rest API endpoints. Another alternative is using some cloud noSQL database to host the JSON data documents and write a server Rest API to serve that data. However, all that is gone, after learning that with Cosmic, you no longer have to write a server side API. Just design your data, insert or import from JSON files, and Cosmic will generate the Rest API automatically for you. As a matter of fact Cosmic, offers two kind of API end points:
- Rest API which will be CRUD methods for adding, displaying, and updating your data.
- GraphQL API, which is also similar to Rest, but you can write your queries using special Syntax called GraphQL. If you're not familiar with GraphQL, I encourage you to review the documents. It's has been gaining a lot momentum lately due to its flexibilities and popularity. Plus it was developed by Facebook. For my application I will include both Rest, and GraphQL methods to let you experiment and decide which one works best for you. If you are not using Cosmic, then you have to write your own server GraphQL API using some database as a storage mechanism, and Node.js for the GraphQL endpoints.
OK, let's jump in to Cosmic and add our data elements. after you sign up for free account, open the dashboard and add new bucket called garage-sale.

After that open the dashboard for this bucket and from the left side menu, add the following Object Type:
- Posts
- Users
- Locations
- PostConditions
- PostCategories
Object Type is the equivalent of a database table, if you're coming from an RDBMS database. After adding each Object Type, you can start defining the metafield for each object type. A metafield is the equivalent of schema, or table columns. So let's see this process below:

So add the following fields to each object type:
# Locations
city: text
state: text
country: text
postalCode: text

# Users
email: text
firstName: text
lastName: text

# Posts
title: text
description: text
condition: PostCondition
price: text
isFree: boolean
categories: [PostCategory]
images: [media/file] (files will be uploaded to Cosmic files.
mainImage: number
isSold: boolean
dateAdded: date
user: User

# PostConditions
name: text
desc: text

# PostCategories
name: text
After adding the Object Type and metafields, it's time to add some data. For adding data just click on the object type from Cosmic dashboard left menu, and start adding data. You can also insert data using the Cosmic CLI
API. Please review the documentation for the CLI functions. I personally used both the dashboard and the CLI to insert the test data for my application. Here is an example of how you would add data to the post categories object type:
# inserting into PostCategories
cosmic add-object --type_slug "postcategories" --title "Shoes" --metafields [{title: "name", value: "Shoes"}]
cosmic add-object --type_slug "postcategories" --title "Cars" --metafields [{title: "name", value: "Cars"}]
and in a similar way you can add all of your objects. For the images, it's easier to open the dashboard, and upload all of your images using the Media function from the left menu of Cosmic dashboard. For my application, each post has multiple images, and each image has three versions. Extra small, small, and medium which will be selected based on the screen display size. Since we are developing for PWA which is mainly for mobile devices, we will be mainly serving xm and sm images. However we are also providing an alternate view for a desktop using the md files just in case if the app is opened from the desktop screen. We will get into more details about how to optimize images for our PWA app further down.

And we are done from the back-end side. In the next section, we will review how to consume our data using Cosmic API.
Consuming the Cosmic API via Rest or GraphQL
As mentioned earlier, Cosmic offers two ways to perform a CRUD operations via API calls. First we can interact with data using plain old API. For the full documentation please review Cosmic Rest API Docs here are few examples:
Cosmic.getObjects({type: 'postcategories', limit: 10})
Cosmic.getObjects({type: 'users', skip: 5, limit: 2})
Cosmic.getObjects({type: 'posts'})
We can also interact with Cosmic via the GraphQL api. Please read the Cosmic GraphQL API for the full documentations. If you like to run few queries and test this API open GraphiQL Playground and write some GraphQL queries:

App state using Vuex, Cosmic, and Vue store
In order to maintain the application state we need to persist data somewhere, and allow all components and modules within our application to share this data. So for this reason we will be using Vuex. So for my app, as mentioned before, I have two actions to fetch data from Cosmic. The first one fetchPosts which will simply call Cosmic REST api and retrieve all posts. I will not dive into this since a lot of documentations has be written about this. The second method is fetchPostsGQ which will fetch post data from Cosmic GraphQL API. So let's take a look on how it is done.
Now let me go over few points from the store file above. First, in order to use the GraphQL API from Cosmic or any other GraphQL API, we need the GraphQL client library. At the time of writing this article there are many js libraries that can be used as a GraphQL client, however I picked apollo-boost because it has in-memory caching feature. I am also using graphql-tag to be able to parse the GraphQL queries written as multi-line string. After that we need to initiate the ApolloClient instance, by providing the URL for the GraphQL API. In our case the url provided to us by CosmicJS is https://graphql.cosmicjs.com/v1. After this, we are ready to write our first GraphQL query, and fetch some data. In the function fetchPostsGQ we can see the syntax of the GraphQL query as the following:
query: gql`query Posts($bucket: String, $type: String!) {
        objectsByType(bucket_slug: $bucket, type_slug: $type) {
            _id
            title
            slug
            metadata
        }
    }`,
variables: {bucket: 'garage-sale', type: 'posts'}
The query above would be the equivalent of the following select statement if you are familiar with SQL language.
SELECT _id, title, slug, metadata
FROM garage-sale.posts
The rest of the code is just required to get the results and populate the state.posts variable. I should also mention that we have state.isDataReady variable which will be set to true as soon as we have data back from the api. Otherwise the UI will show some kind of loading icon. Lastly, I would like to mention all the data needed for our UI, will be selected from post.metadata which is just the format of the data returned from Cosmic. Please take a look at store/index.js for the full source code of the Vuex store.
Loading initial data and populating the home page
When starting the application we will see the data loading spinner for few seconds, then we will see grid loaded with the data from the server.

We are able to achieve this by first calling loadInitialData from the main.js
As you can see in the code above, to trigger the fetch data we just call the loadInitialData action from the application created life hook.
Now let's take a look at the Home.vue component and see how we use this data.
As you can see from the code above, there is a computed property posts which will be fetched directly from the Vuex store. And this posts property is passed down as a component prop to the PostGrid component. The PostGrid component
will loop through the array elements and draw the post item on the screen.
In the home page, there is also a search function, which will simply take the search term from the input textbox and call the fetchPosts action again with the keyword parameter.
Displaying the Post details page
Each item in the PostGrid from the home page, will have a link to the post page
And when we click on the PostItem the router will take the user to the PostDetails page.

Once we land on this page we have four major functions:
- Swipe up: displays the post item previous image
- Swipe down: displays the post item next image
- Swipe left: displays the next post item
- Swipe right: displays the previous post item
Besides the swipe function, that will require a touch screen device, there are other functions like the Contact Seller button, and the More Info buttons which are straight forward. On the click of each of this buttons we show/hide a section on the view by using Vue v-show and v-bind directives.
The last piece of this puzzle, is the post details carousel which is used to browse through the images of the post item. For this project, I've used Vuetify Carousel component to display multiple images, and allow the user to browse through these images by using the swipe up and down actions. I also included in this project /src/components/PostCarousel.vue. This component, is an extension of vuetify.carousel with few tweaks. I've added the vertical swipe mode to allow the user to browse through images. Out of the box vuetify.carousel will only allow left/right swiping. So if you take a look at the code you will see that this component extends the VCarousel component
So, there you have it! This is how you use component inheritance, and extend third party components in its most basic ways.
How about the desktop view?
Even though this app is built mainly for mobile devices, adding just few lines of code will make it desktop friendly as well. As a part of Vuetify, you can write responsive web apps easily using the grid layout system. For example:
This, means that this div will take the full width of the page if this is xm , which means extra small device. It will take half of the width for small size screens or larger. Knowing that each screen has about 12 columns in total, there is also another feature of Vuetify that will allow us to query screen size and issue conditional statements or apply conditional styling. It's called breakpoint and can be used as the following:
# only apply the css class if size is medium and up# image size will be calculated based if screen size is small and down const imgSize = this.$vuetify.breakpoint.smAndDown ? '200px' : '400px'

As you can see, the post details page on the desktop is only taking half width. I also included navigation arrows (left, right, top, bottom) since there are no swipe capabilities on the desktop version. All of that logic, can implementing with Vuetify and Vue fairly easily.
One more thing is worth mentioning is that the post images resolution will change based on screen size. So for each image there are three resolutions xm, sm, and md. And there is logic to show the appropriate image based on the screen size. Let's see ho did we acheive that.
First all post images need to be optimized for PWA, and produce three files for each image. For instance if a post has an image named adidas-yeezy-color-fashion-1280064.jpg then we will need to produce three version of this image as below:
- adidas-yeezy-color-fashion-1280064-xs_1x.jpg
- adidas-yeezy-color-fashion-1280064-sm_1x.jpg
- adidas-yeezy-color-fashion-1280064-md_1x.jpg
There are many ways, applications, tools and websites that you can use to optimize images and automate the process. In the next section, I will explain more about this process and PWA optimization. However in this section, I just wanted to show you how to conditionally change the UI, and display different images based on screen sizes.
    postImages () {
        const imgSize = this.$vuetify.breakpoint.smAndDown ? '-xm_1x' : '-sm_1x'
        ...
    },
The code above is simply selecting the right image file name based on the screen size.
Time to run the app and test it
I think at this point our application is ready for some testing. To check and see how the app is behaving on a mobile device, I strongly recommend using Chrome dev tool. From there, you can use the device toolbar to change your device screen size. You can also see how the app will behave with a touch screen capability. I believe Safari has a similar feature, called Enter Responsive Design Mode under the development menu. Another useful feature that allow me to test how actual phone feels was the xCode device simulator. I used this function when I was troubleshooting some issues specific to iPhones, and it really came in handy. I believe that xCode can be installed easily on a mac, however I am not sure about PCs! But I think that Windows OS should have similar apps or other device simulators.

I also, recommend using vue-dev-tools addon for Chrome. It will save you a lot of time debugging and seeing what's going on under the hood.
So to run the application simply run the following vue-cli commands:
# run on dev mode
npm run serve

# build you app for production
npm run build

# serve prod build on your local machine. You need to install serve first (npm install serve)
serve -s dist
For this project I am using http-serve to serve my PWA app on the server, because it offer many useful features like:
- https capabilities
- gzip files serving
You can also write your own node/express server if you like to have control, but for me this was quicker.
Optimizing PWA application with Google Lighthouse
After all this work, the moment of the truth came when I ran application audits using Google Lighthouse from Chrome dev-tools. The first time I ran the audits the score was terrible = below 50%. This is how it looked at some point, before implementing few suggestions

After the first run, I had to go through Lighthouse scores one by one and implement all the suggestion recommended. And each time the scores were getting better and better. I have also gained more insights on how SEO, performance, PWA... are scored and how to make each one of those areas better. After many iterations I had the following score:

Even though, I didn't score 100% in all categories, I felt much better and learned a lot by just implementing the changes suggested by Google. Is it possible to score 100% in all categories? you may ask. And the answer is yes, if you are willing to spend time and implement all the recommendations.
One major problem that was affecting the site performance was the images. I realized that the images that I was serving were not matching the screen size. So after going through some suggestions, I found this article A Guide to Responsive Images with Ready-to-Use Templates which explains the problem in detail and also lays out the best solution for you. So after the article above, I created a grunt process that goes through each image under a folder, and produce multiple versions.
I know that I didn't go through every line of code here, however I strongly recommend you try the application demo and see how it feels. You can also check out the code and see if you have any questions.
Conclusion
Building a PWA application may feels daunting task at first. However with the help of Vue templates, Vuetify, and Cosmic, the task felt more enjoyable, and I learned few more tricks at the end. My conclusion is that you may not know all the answers before your journey, however, as long as you have the ability to ask those questions, and try new things, you will learn and grow in your journey to building great things.
Thanks for taking the time to read my story, and I hope that I have inspired you to build you next PWA idea. Let me know if you have any questions or comments. Reach out to us on Twitter and join our Slack community.
Continue Learning
Ready to get started?
Build your next project with Cosmic and start creating content faster.
No credit card required • 75,000+ developers